Developer Guide
- Acknowledgements
- Setting up, getting started
- Design
- Implementation
- Documentation, logging, testing, configuration, dev-ops
- Appendix: Requirements
- Appendix: Instructions for manual testing
Acknowledgements
-
Encrypting and Decrypting Files in Java from Baeldung
- Adapted and modified. See section on Encryption.
Setting up, getting started
Refer to the guide Setting up and getting started.
Design
.puml files used to create diagrams in this document can be found in the diagrams folder. Refer to the PlantUML Tutorial at se-edu/guides to learn how to create and edit diagrams.
Architecture
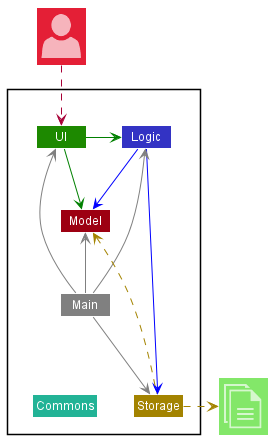
The Architecture Diagram given above explains the high-level design of the App.
Given below is a quick overview of main components and how they interact with each other.
Main components of the architecture
Main has two classes called Main and MainApp. It is responsible for,
- At app launch: Initializes the components in the correct sequence, and connects them up with each other.
- At shut down: Shuts down the components and invokes cleanup methods where necessary.
Commons represents a collection of classes used by multiple other components.
The rest of the App consists of five components.
-
UI: The UI of the App. -
Logic: The command executor. -
Model: Holds the data of the App in memory. -
Storage: Reads data from, and writes data to, the hard disk. -
Encryption: Encrypts and decrypts data
How the architecture components interact with each other
The Sequence Diagram below shows how the components interact with each other for the scenario where the user issues the command delete 1.
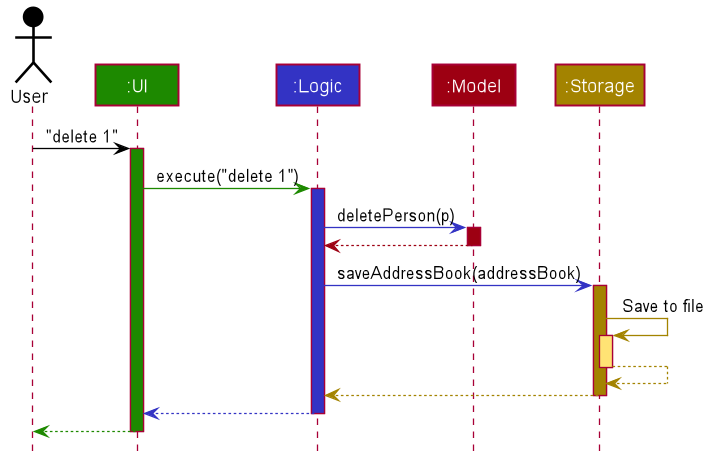
Each of the main components (also shown in the diagram above),
- defines its API in an
interfacewith the same name as the Component. - implements its functionality using a concrete
{Component Name}Managerclass (which follows the corresponding APIinterfacementioned in the previous point).
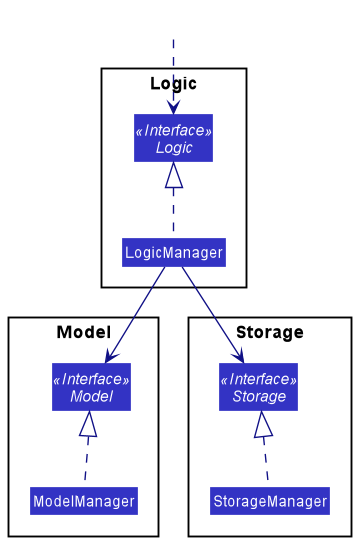
For example, the Logic component defines its API in the Logic.java interface and implements its functionality using the LogicManager.java class which follows the Logic interface. Other components interact with a given component through its interface rather than the concrete class (reason: to prevent outside component’s being coupled to the implementation of a component), as illustrated in the (partial) class diagram below.
The sections below give more details of each component.
UI component
The API of this component is specified in Ui.java
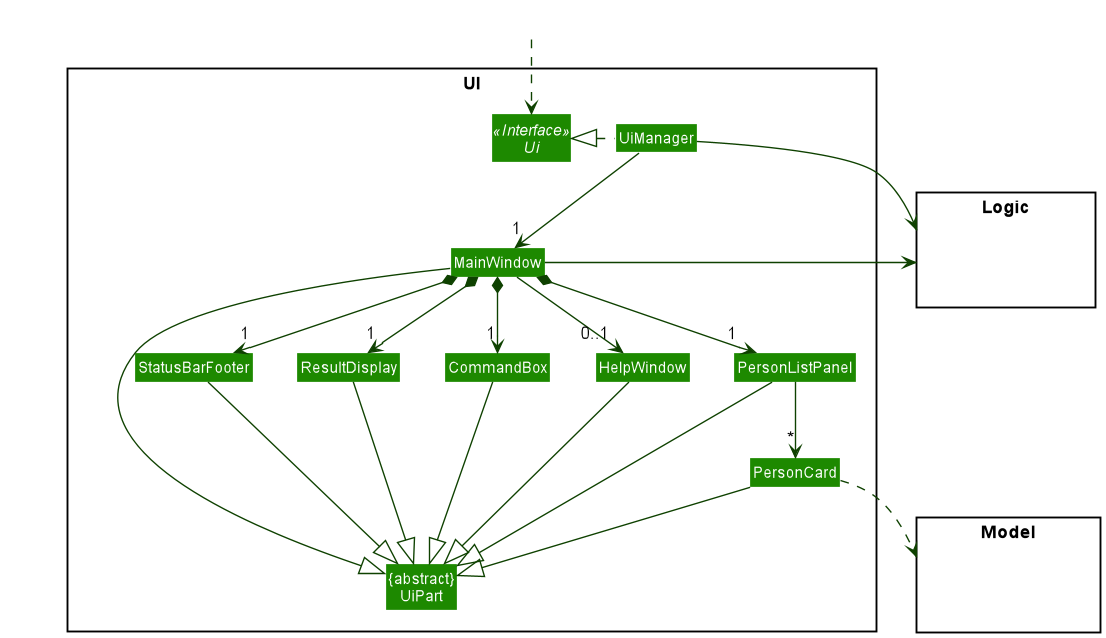
The UI consists of a MainWindow that is made up of parts e.g.CommandBox, ResultDisplay, PersonListPanel, StatusBarFooter etc. All these, including the MainWindow, inherit from the abstract UiPart class which captures the commonalities between classes that represent parts of the visible GUI.
The UI component uses the JavaFx UI framework. The layout of these UI parts are defined in matching .fxml files that are in the src/main/resources/view folder. For example, the layout of the MainWindow is specified in MainWindow.fxml
The UI component,
- executes user commands using the
Logiccomponent. - listens for changes to
Modeldata so that the UI can be updated with the modified data. - keeps a reference to the
Logiccomponent, because theUIrelies on theLogicto execute commands. - depends on some classes in the
Modelcomponent, as it displaysPersonobject residing in theModel.
Logic component
API : Logic.java
Here’s a (partial) class diagram of the Logic component:
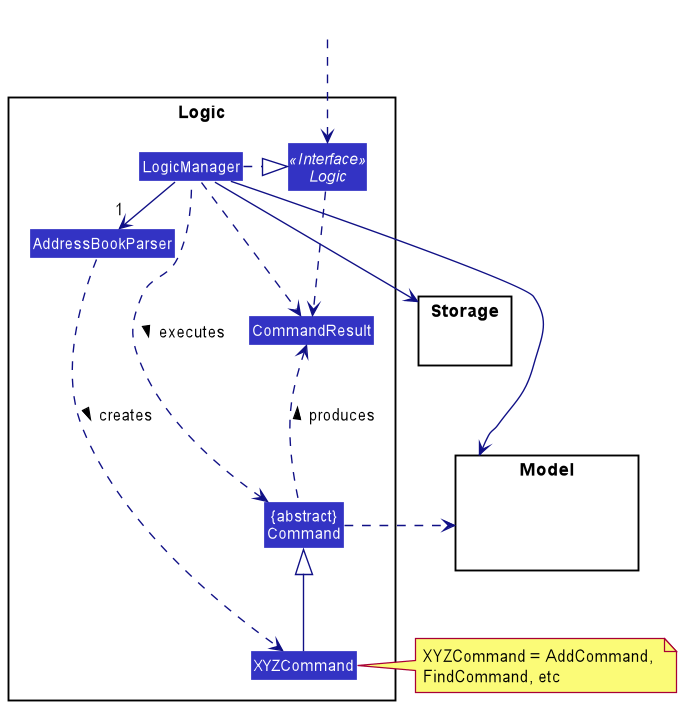
How the Logic component works:
- When
Logicis called upon to execute a command, it uses theAddressBookParserclass to parse the user command. - This results in a
Commandobject (more precisely, an object of one of its subclasses e.g.,AddCommand) which is executed by theLogicManager. - The command can communicate with the
Modelwhen it is executed (e.g. to add a person). - The result of the command execution is encapsulated as a
CommandResultobject which is returned back fromLogic.
The Sequence Diagram below illustrates the interactions within the Logic component for the execute("delete 1") API call.
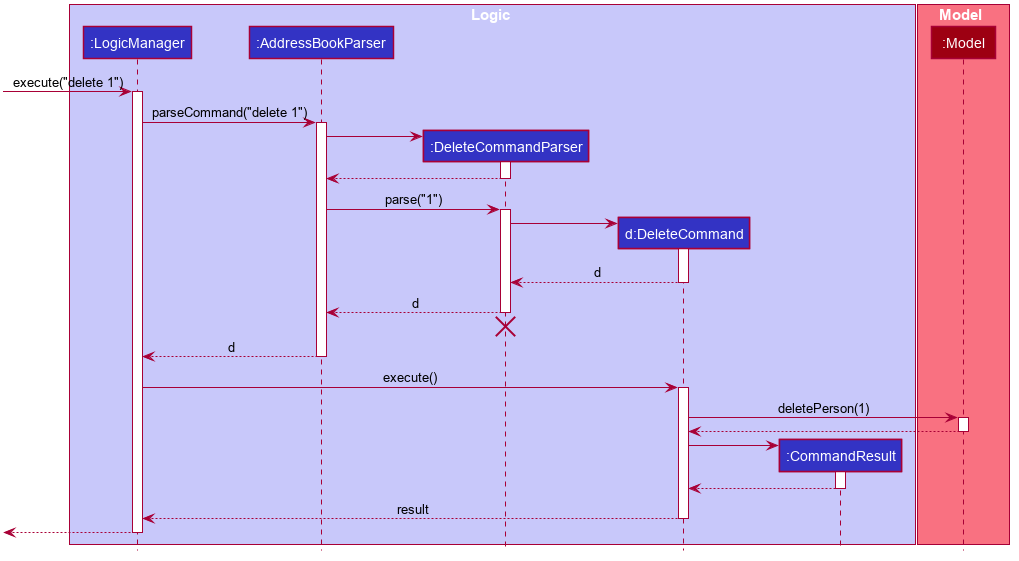
DeleteCommandParser should end at the destroy marker (X) but due to a limitation of PlantUML, the lifeline reaches the end of diagram.
Here are the other classes in Logic (omitted from the class diagram above) that are used for parsing a user command:
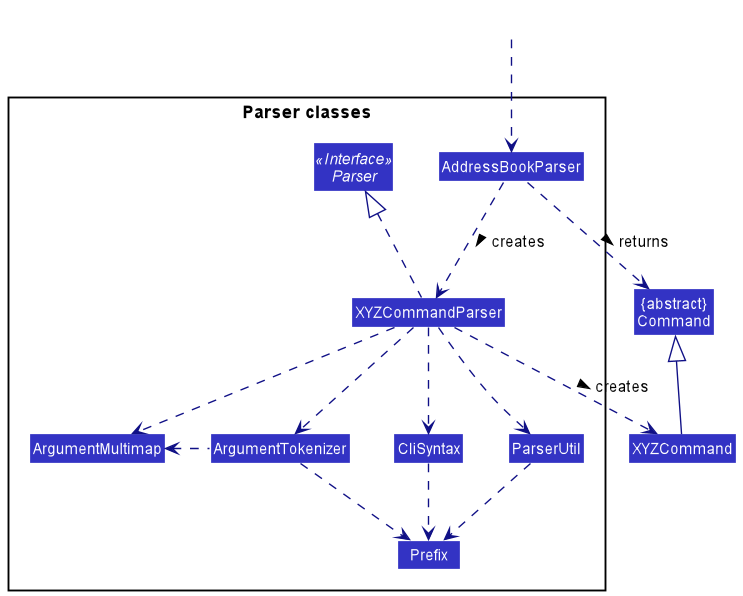
How the parsing works:
- When called upon to parse a user command, the
AddressBookParserclass creates anXYZCommandParser(XYZis a placeholder for the specific command name e.g.,AddCommandParser) which uses the other classes shown above to parse the user command and create aXYZCommandobject (e.g.,AddCommand) which theAddressBookParserreturns back as aCommandobject. - All
XYZCommandParserclasses (e.g.,AddCommandParser,DeleteCommandParser, …) inherit from theParserinterface so that they can be treated similarly where possible e.g, during testing.
Model component
API : Model.java
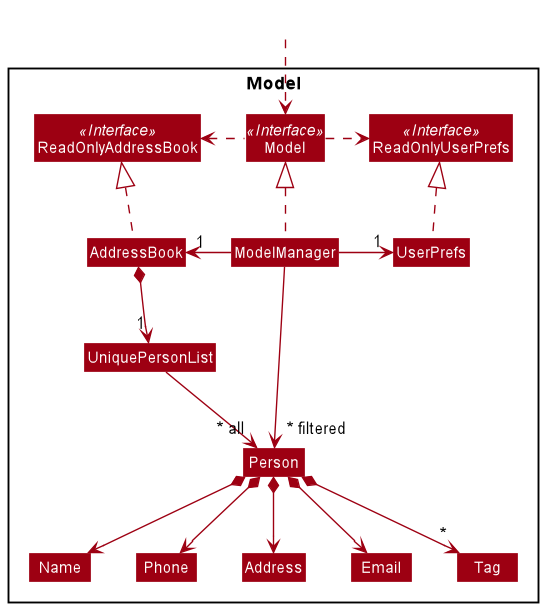
The Model component,
- stores the data i.e., all
Personobjects (which are contained in aUniquePersonListobject). - stores the currently ‘selected’
Personobjects (e.g., results of a search query) as a separate filtered list which is exposed to outsiders as an unmodifiableObservableList<Person>that can be ‘observed’ e.g. the UI can be bound to this list so that the UI automatically updates when the data in the list change. - stores a
UserPrefobject that represents the user’s preferences. This is exposed to the outside as aReadOnlyUserPrefobjects. - does not depend on any of the other three components (as the
Modelrepresents data entities of the domain, they should make sense on their own without depending on other components)
Tag list in the AddressBook, which Person references. This allows AddressBook to only require one Tag object per unique tag, instead of each Person needing their own Tag objects.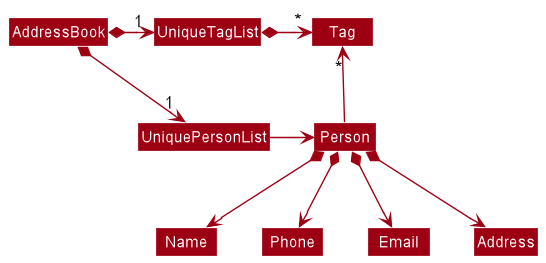
Storage component
API : Storage.java
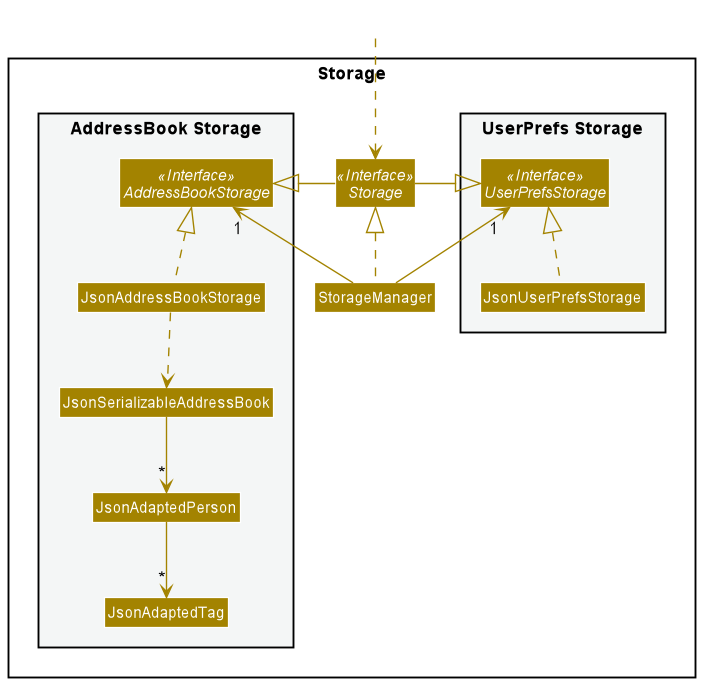
The Storage component,
- can save both address book data and user preference data in
.jsonformat, and read them back into corresponding objects. - inherits from both
AddressBookStorageandUserPrefStorage, which means it can be treated as either one (if only the functionality of only one is needed). - depends on some classes in the
Modelcomponent (because theStoragecomponent’s job is to save/retrieve objects that belong to theModel)
Encryption component
API : Encryption.java
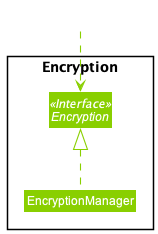
The Encryption component,
- encrypts data files and writes to
.encformat.- accepts file in any format for encryption, per the supplied
Path.
- accepts file in any format for encryption, per the supplied
- decrypts data files from
.encformat.- writes to file in any format after decryption, per the supplied
Path.
- writes to file in any format after decryption, per the supplied
- performs the encryption using a secret key supplied by the
EncryptionKeyGeneratorutility class and the cipher algorithm.
Common classes
Classes used by multiple components are in the seedu.addressbook.commons package.
History
API : History.java
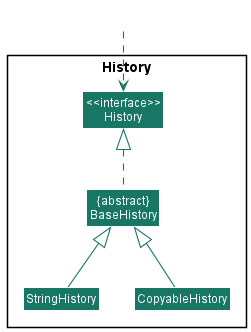
The History component,
- can save immutable snapshots of object instances of any class and supports the retrieval of the saved snapshots at any time.
- is implemented by the following classes.
-
StringHistory, which supports the saving of strings. -
CopyableHistory, which supports the saving of objects.
-
Implementation
This section describes some noteworthy details on how the following features are implemented.
Command Input History
Design Considerations
User Story
As an experienced command line user, I want to be able to press the up and down arrow keys to cycle through my past commands.
- As an experienced command line user, I want to be able to modify a previously entered command to create a new command without changing what is saved.
Use Cases
System:         SPAM (Super Powerful App for Marketing)
Use case:       UC1 - Save the entered command
Actor:          User
MSS:
                1.  User enters a command.
                2.  User executes the command.
                3.  System saves the executed command.
                Use case ends.

Extensions:
                2a. System detects that the executed command is either empty string or spaces.
                    2a1.    System does not save the executed command.
                Use case ends.
System:         SPAM (Super Powerful App for Marketing)
Use case:       UC2 - Go to previously entered command
Actor:          User
Preconditions:  User has previously saved a command
MSS:
                1.  User presses the up arrow key.
                2.  System displays the previously entered command.
                Use case ends.

Extensions:
                1a. System detects that the earliest entered command is displayed.
                    1a1.    System continues to display the earliest entered command.
                Use case ends.
System:         SPAM (Super Powerful App for Marketing)
Use case:       UC3 - Go to next entered command
Actor:          User
Preconditions:  User has previously entered a command, System is displaying a previously entered command
MSS:
                1.  User presses the down arrow key.
                2.  System displays the next entered command.
                Use case ends.

Extensions:
                1a. System detects that the newest entered command is displayed.
                    1a1.    System continues to display the newest entered command.
                Use case ends.
System:         SPAM (Super Powerful App for Marketing)
Use case:       UC4 - Edit a previously entered command
Actor:          User
Preconditions:  User has previously entered a command, System is displaying a previously entered command
MSS:
                1.  User presses any key to edit the previously entered command displayed.
                2.  User executes the edited command.
                3.  System resets the previously saved command.
                4.  System saves the executed command as the newly entered command.
                Use case ends.
Considerations
There are a few ways in which the history system’s data structure could be implemented. Some possible options are elaborated in detail here. Below are the pros and cons of some options.
| Method | Advantages | Disadvantages |
|---|---|---|
| 2 Stack | Scrolling through saved snapshots in the history is fast. | May cause problems during the implementation of UC4. |
| Array | Scrolling through saved snapshots in the history is fast. Easier to support UC4 in the implementation. | Appending new saved snapshots to the front is very slow. |
| Queue | Easier to support UC4 in the implementation. Appending snapshots to the front is very fast | Scrolling through saved snapshots in the history is slower than above methods. |
In the end, we decided to implement the History data structure using a queue because it has the smallest disadvantage. This is because the maximum size of the history that we anticipate will not be very large (ie. less than 200). As such, the disadvantage of computationally expensive queue retrievals will not be as significant as the disadvantages brought about by the other two implementations.
Implementation
The implementation of the command input history feature can be split into two parts. The implementation of the history API and how it is used in the feature.
History API
The specifications of the history API can be found in the
History
interface located in the commons.util.history
package. This interface mandates that all implementations of History should implement the following methods:
-
#add(object)- Add a snapshot of the object into the history. -
#get(index)- Get the snapshot of the object stored at the index in the history. -
#size()- Get the number of snapshots currently stored in the history.
The history API is implemented by abstract class BaseHistory
which provides the storage mechanism and options for the
saved snapshots. The StringHistory
and CopyableHistory
classes then perform the defensive copying of provided objects in addition to making use of BaseHistory for the
storage mechanism. The defensive copying mechanism of #add(object) in CopyableHistory can be illustrated with a
sequence diagram as shown below.

Usage
The command input history feature is implemented by the
CommandInput
class in the ui package.
The class diagram below shows the structure of the implementation.
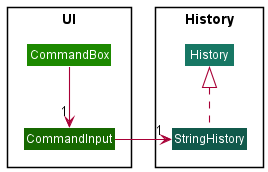
CommandInput exposes the following methods for CommandBox to control its state.
-
#value()- Gets the current value in theCommandInput -
#set(string)- Sets the current value in theCommandInputto the string. -
#next()- Retrieves the next previously entered command. -
#previous()- Retrieve the next recently entered command. -
#save()- Saves the current string in theCommandInputto the history.
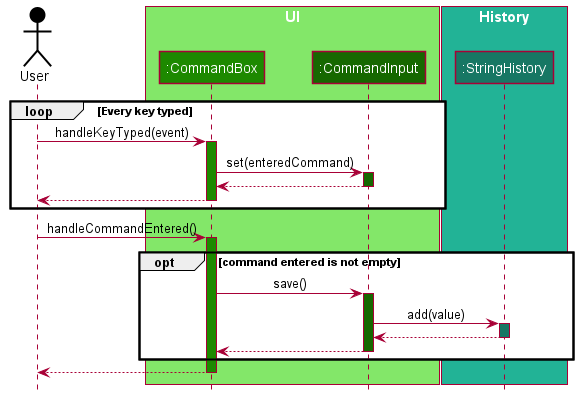
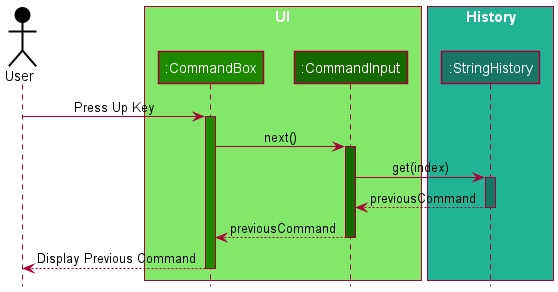
The following sequence diagrams show what happens when the user enters the command, executes the command and presses the up arrow key to go to a previously entered command.
Batch Import
Implementation
The chosen implementation of the ImportCommand pulls up a CsvFileSelector window that only allows csv files to be selected.
Once a file is selected, the command is supported by two parsers.
-
CsvParser— Deals with parsing a csv file and assigning its body to its headers via key-value pairs. -
ImportCommandParser— Retrieves the relevant entries fromCsvParserthen checks if the necessary fields are present and correctly formatted before creating thePersonobjects that will be added to theModelinImportCommand.
The Sequence Diagram below illustrates the interactions within the Logic component for the execute("import") API call.
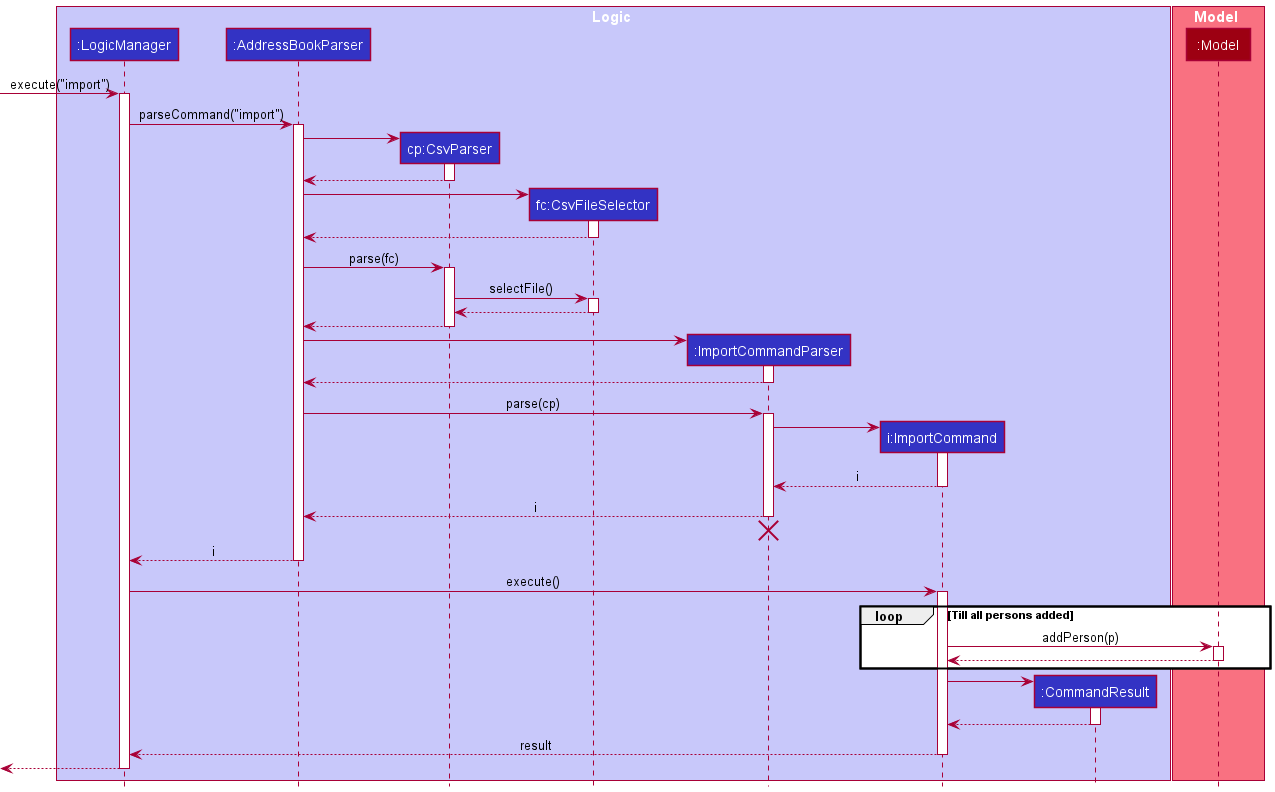
ImportCommandParser finds any wrongly formatted fields in any of the entries, the ImportCommand is not created and executed. Instead a CommandException is thrown describing the entries that are wrongly formatted and the field in the entry that is responsible for it.
Design considerations:
Aspect: How csv file is chosen:
-
Alternative 1 (current choice):
FileSelectorwindow.- Pros:
- Ensures users select files that exist and are in the csv format.
- Allows for easy navigability between directories for quick retrieval of the wanted file.
- Cons:
- Diverts from target user profile by utilising GUI for commands.
- Pros:
-
Alternative 2: Csv file path to be inputted after
importin command call.- Pros:
- Meets target user profile by utilising CLI rather than GUI.
- Cons:
- More troublesome for the user as user has to search for the csv file’s absolute path.
- File could also not exist or be in the wrong format. Would require additional exception handling.
- Pros:
Batch Export
Implementation
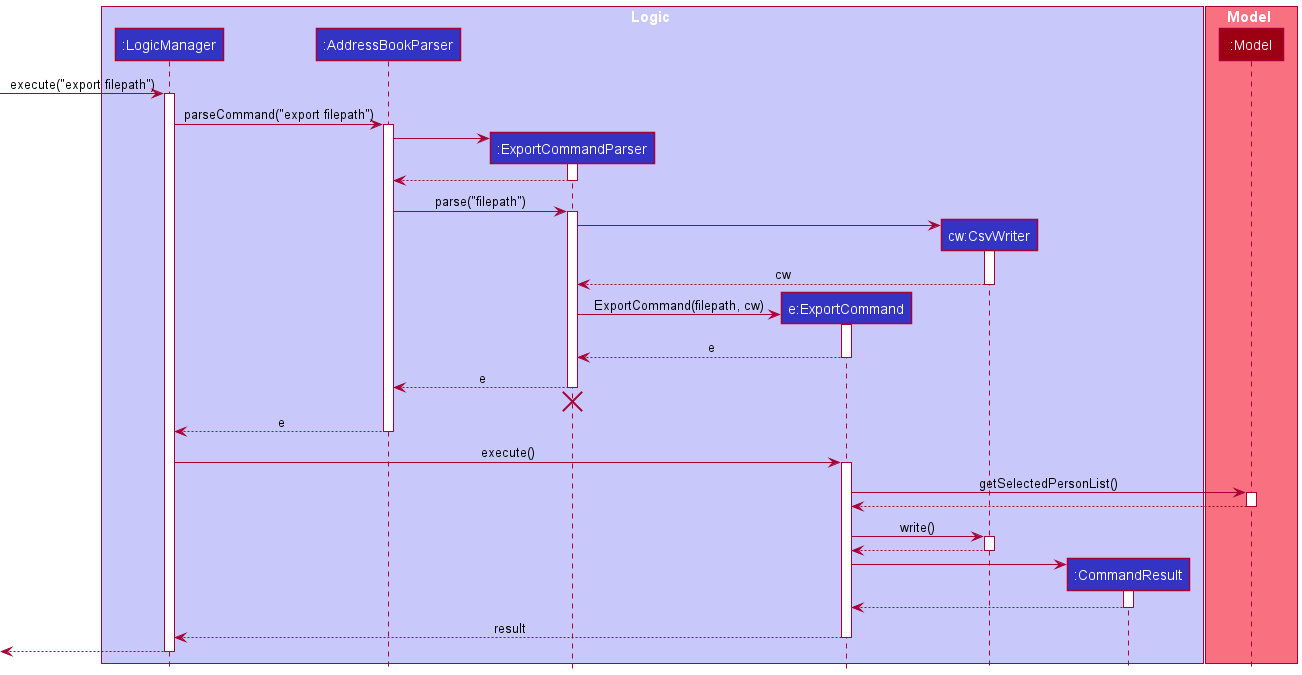
The export feature is implemented with the following classes:
-
ExportCommandParser— Ensures argument provided for the export command is a valid filename. -
ExportCommand— Handles communication withModelto extract theselectedPersonListand converts each field ofPersoninto its String representation before handing the data to theCsvWriter. -
CsvWriter— A utility class that handles the task of writing to csv files.CsvWriter#write()takes in a filepath, an array of headers and the data mapped to aforementioned headers via ajava.util.HashMap. The data is then written to a csv file located at the provided filepath.
The Sequence Diagram below illustrates the interactions within the Logic component for the execute("export filepath") API call.
Encryption
Specifications:
- Encryption standard: AES
- Block cipher: AES-256
- Key generation method: user-supplied password (up to 32 characters long)
- File extension:
.enc
Implementation
The encryption feature is implemented with the following classes:
-
EncryptionManager— Handles the encryption and decryption of data files.- Needs a
SecretKey, which is provided byEncryptionKeyGeneratorutility class. - Needs a cipher transformation algorithm (AES/CBC/PKCS5Padding); this has been handled by the
javax.crypto.CipherAPI.
- Needs a
-
EncryptionKeyGenerator— A utility class that provides the method to generate AES-256 compliant keys.-
EncryptionKeyGenerator#generateKey()— Generates a key with the supplied password. It can also be seen as a very complex hash function.
-
-
MainApp—EncryptionManageris initiated here and passed as parameter to the constructor ofLogicManager.- There should be one and only one
EncryptionManagerinstance at any time. - This acts as a single source of truth, which avoids clashing keys.
- There should be one and only one
-
LogicManager— Theexecute()method usesEncryptionManagerto decrypt the program data before consuming the data.- The entirety of the data file lifecycle happens within the
execute()method.
- The entirety of the data file lifecycle happens within the
An encrypted file can only be decrypted with the same AES key that was used to encrypt it. In this case, the AES keys are generated solely using a password string supplied by the user. Multiple instances of AES keys are said to be the same if the password string used to generate these keys are the same. This definition of equality ensures the validity of the generated key across sessions.
As a result of this implementation, the same encrypted file can be shared across devices as long as the supplied password is the same.
The supplied password string must be 32 characters long (32 characters = 256 bits needed to generate the AES key). Passwords shorter than 32 characters will be padded with "/" to extend the number of bits. Passwords longer than 32 characters are not supported. As a consequence, the length and randomness of the supplied password make up the strength of the encryption. Shorter and less random passwords are most vulnerable to brute force attacks.
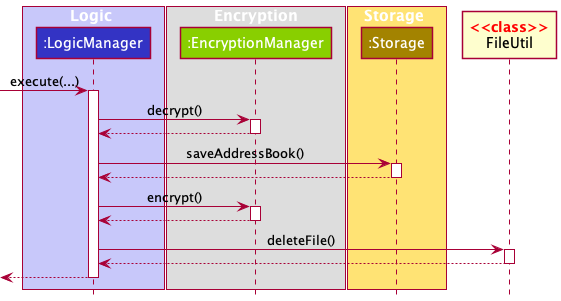
Data file lifecycle
The program’s data undergoes a lifecycle per operation:
- The contents of the encrypted data file is decrypted, and is written to a temporary
.jsonfile. - Other components of the program consumes the
.jsonfile and modifies its contents. - The modified
.jsonfile is encrypted and overwrites the contents of the encrypted data file. - The temporary
.jsonfile is deleted.
The lifecycle ensures the program’s data stays encrypted at any point in time. In the event of a program crash, the decrypted file will be impossible to recover, but the encrypted file will stay intact. There is no performance delay in operating data up to 1,200 contacts.
The lifecycle can be described by the following sequence diagram:
In the case when there is no data on startup, the following actions will take place:
- The sample data is written to a temporary
.jsonfile. - The
.jsonfile is encrypted. - The temporary
.jsonfile is deleted.
The data then proceed with the normal lifecycle per operation as described above.
Password
Implementation
The password is used to generate the Encryption in the LogicManager. As mentioned in the Encryption section, it will be used to encrypt and decrypt the data file.
The password feature applies to the following situations. Note that parts of the situation may be omitted for simplicity.
First time set up
The user will be asked to set up a new password if no data file has been detected. The diagram below summarises the workflow.

The system first checks if the two password match. Then, the validity of the password is checked and valid password will be used to generate the Encryption in LogicManager.
Subsequent logins
The user will be asked to enter the password of the encrypted data file. The diagram below summarises the workflow.
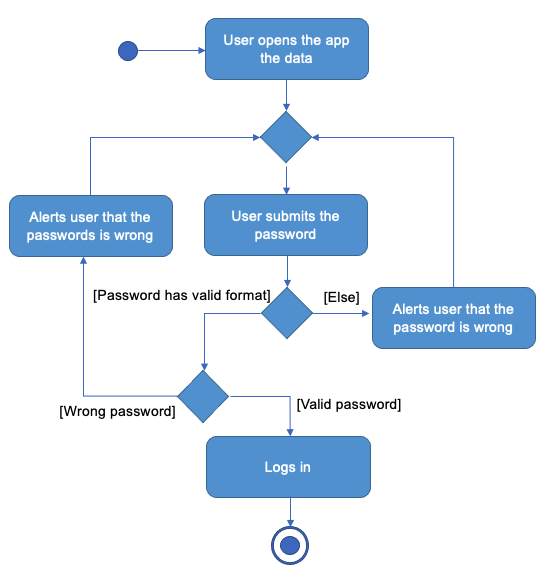
The system first checks if the password is valid. This is due to the fact that the AES encryption pads the password with / if the password is less than 32 characters. Therefore, it is necessary to check for the validity for proceeding with the decryption of the data file. Then, the password is used to generate a new Encryption and it is used to decrypt the data file. If the password is wrong, an exception will be thrown during the decryption and the user will be notified. Otherwise, the user will be able to log in and proceed with using the application.
Changing password
The user can change the password if they wish. The diagram below summarises the workflow.
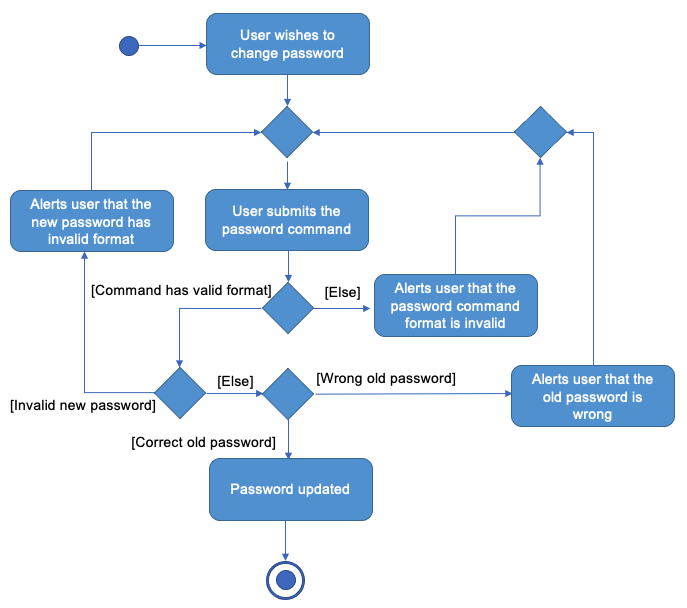
The PasswordCommandParser checks the format and the validity of the new password. Then, the LogicManager will check if the old password supplied is correct. If the old password is correct, the Encryption in LogicManager will be updated and the data file will be encrypted with the new Encryption. This enables the changing of password.
The Sequence Diagram below illustrates the interactions within the Logic component for changing a password. Note that some parts are omitted for simplicity.
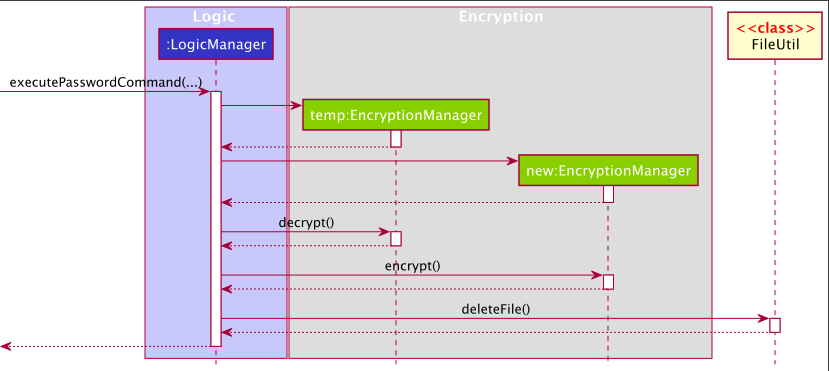
The PasswordCommand is executed by a special executePasswordCommand method. Two EncryptionManager are created, each corresponds to one password. The one for the old password will be used to decrypt the data file. The one for the new password will be used to encrypt the decrypted data file. The decrypted data file is then removed. This completes the process of changing password.
Find feature
Implementation
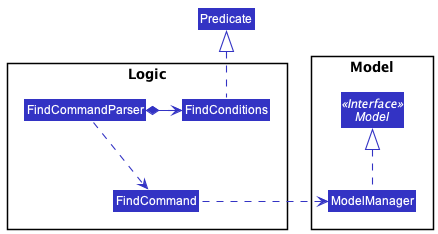
The find feature leverages on the Model#updateFilteredPersonList(Predicate<Person>) method. It is known that FindCommand instances each kept a reference to a NameContainsKeywordsPredicate instance for updating the model’s filtered list, but since v1.2 it has been changed to take in a more general Predicate<Person>. This allows us to freely manipulate FindCommandParser to generate varieties of find conditions.
In order to systematically process multiple options for a user input’s in a find command, we are obliged to create a static inner class FindConditions, which implements Predicate<Person>, with the following methods:
-
#test(Person)- Overridden method to test whether the givenPersonsatisfy the find conditions -
#toString()- Overridden method for the string representation of the find conditions -
#put(PersonField, List<String>)- Adds a find condition, which is list of keywords to be tested against a field
The following is the class diagram summarizing the description above:
Documentation, logging, testing, configuration, dev-ops
Appendix: Requirements
Product scope
Target user profile:
- handles large volumes of internal and external communications
- prefer desktop apps over other types
- can type fast
- prefers typing to mouse interactions
- is reasonably comfortable using CLI apps
- requires fast manipulation and precise handling of contact data
Value proposition: manage contacts faster than a typical mouse/GUI driven app, and minimise tedious and repetitive tasks such as data entry, email blasts, and mail merge
User stories
Priorities: High (must have) - * * *, Medium (nice to have) - * *, Low (unlikely to have) - *
| Priority | As a … | I want to … | So that I can… |
|---|---|---|---|
* * * |
new user | get help | refer to instructions when I forget how to use the App |
* * * |
new user | batch import contacts | quickly get started |
* * * |
user | search for a specific field | filter my result easily |
* * * |
user | update contact details | the information stays updated |
* * * |
user | purge all data | easily start over |
* * * |
careless user | have case-insensitive commands | speed up my typing |
* * * |
marketer | keep my data encrypted | secure my customer data |
* * * |
privacy-focused user | have password protection | makes sure only I can access my data |
* |
careless user | be warned about incorrect data format | minimise errors |
* |
with incomplete contact data | have autofill suggestions | make the contact data complete |
Use cases
(For all use cases below, the System is the AddressBook and the Actor is the user, unless specified otherwise)
Use case: Batch Import
MSS
- User requests to batch import
- AddressBook shows file selection window
- User selects the file
-
AddressBook adds the data
Use case ends.
Extensions
-
3a. The file is not in the correct format.
Use case ends.
Use case: Filter by fields
MSS
- User inputs filter requirement
-
AddressBook shows matching results
Use case ends.
Extensions
-
1a. The command is not in the correct format.
Use case ends.
Non-Functional Requirements
- Should work on any mainstream OS as long as it has Java
11or above installed. - Should be able to hold up to 1000 persons without a noticeable sluggishness in performance for typical usage.
- Should be able to import up to 1000 persons without a noticeable sluggishness in performance.
- A user with above average typing speed for regular English text (i.e. not code, not system admin commands) should be able to accomplish most of the tasks faster using commands than using the mouse.
Glossary
- Mainstream OS: Windows, Linux, Unix, OS-X
Appendix: Instructions for manual testing
Given below are instructions to test the app manually.
Launch and shutdown
-
Initial launch
-
Download the jar file and copy into an empty folder
-
Double-click the jar file
Expected: Shows the GUI prompting users to set up a password. The window size may not be optimum.
-
-
Saving window preferences
-
Resize the window to an optimum size. Move the window to a different location. Close the window.
-
Re-launch the app by double-clicking the jar file.
Expected: The most recent window size and location is retained.
-
Deleting a person
-
Deleting a person while all persons are being shown
-
Prerequisites: List all persons using the
listcommand. Multiple persons in the list. -
Test case:
delete 1
Expected: First contact is deleted from the list. Details of the deleted contact shown in the status message. -
Test case:
delete 0
Expected: No person is deleted. Error details shown in the status message. Status bar remains the same. -
Other incorrect delete commands to try:
delete,delete x,...(where x is larger than the list size)
Expected: Similar to previous.
-
Saving data
-
Dealing with missing/corrupted data files
-
To simulate a missing data file, delete
addressbook.encfrom thedatadirectory.
Expected: Shows the GUI prompting users to set up a password. After setup, the application gives the user a fresh set of sample data. -
To simulate a corrupted data file, open
addressbook.encin a text editing software such as vim or notepad, and deliberately modify its contents.
Expected: Shows the GUI prompting users to enter a password. When the previous password is entered, the GUI will show an error stating the user has entered a wrong password.
-